Schnorr
![]()
在创建和验证数字签名方面,Schnorr 签名优于 ECDSA。
它们比 ECDSA 更简单、更高效且更安全。
此外,更简单的数学运算还允许您将签名相加,以及同时验证多个签名。这是 ECDSA 所不具备的两个功能。
无论如何,作为 Taproot 升级的一部分,Schnorr 签名于 2021 年被引入比特币中,目前用于解锁 P2TR 锁定脚本。
在本页中,我将向您展示如何实现比特币中的 Schnorr 签名,并简要解释它们的工作原理。
Schnorr 签名(完整代码)
# -------------------------
# Elliptic Curve Parameters
# -------------------------
# these are the parameters for secp256k1, which is the same curve used in ECDSA
# note: setting these as $global variables so they're accessible from with the functions below (without having to pass them as arguments)

# y² = x³ + ax + b
$a = 0
$b = 7

# prime field
$p = 115792089237316195423570985008687907853269984665640564039457584007908834671663 #=> 0xFFFFFFFFFFFFFFFFFFFFFFFFFFFFFFFFFFFFFFFFFFFFFFFFFFFFFFFEFFFFFC2F

# number of points on the curve we can hit ("order")
$n = 115792089237316195423570985008687907852837564279074904382605163141518161494337 #=> 0xFFFFFFFFFFFFFFFFFFFFFFFFFFFFFFFEBAAEDCE6AF48A03BBFD25E8CD0364141

# generator point (the starting point on the curve used for all calculations)
$G = {
  x: 55066263022277343669578718895168534326250603453777594175500187360389116729240, #=> 0x79BE667EF9DCBBAC55A06295CE870B07029BFCDB2DCE28D959F2815B16F81798
  y: 32670510020758816978083085130507043184471273380659243275938904335757337482424, #=> 0x483ADA7726A3C4655DA4FBFC0E1108A8FD17B448A68554199C47D08FFB10D4B8
}

# --------------------------
# Elliptic Curve Mathematics
# --------------------------

# Modular Inverse: Ruby doesn't have a built-in modinv function
def inverse(a, m = $p)
  m_orig = m         # store original modulus
  a = a % m if a < 0 # make sure a is positive
  y_prev = 0
  y = 1
  while a > 1
    q = m / a

    y_before = y # store current value of y
    y = y_prev - q * y # calculate new value of y
    y_prev = y_before # set previous y value to the old y value

    a_before = a # store current value of a
    a = m % a # calculate new value of a
    m = a_before # set m to the old a value
  end
  return y % m_orig
end

# Double: add a point to itself
def double(point)
  # check for point at infinity (greatest common divisor between 2y and p isn't 1)
  if (((2 * point[:y]) % $p).gcd($p) != 1) # taken from BitcoinECDSA.php
    raise "Point at infinity."
  end

  # slope = (3x₁² + a) / 2y₁
  slope = ((3 * point[:x] ** 2 + $a) * inverse((2 * point[:y]), $p)) % $p # using inverse to help with division

  # x = slope² - 2x₁
  x = (slope ** 2 - (2 * point[:x])) % $p

  # y = slope * (x₁ - x) - y₁
  y = (slope * (point[:x] - x) - point[:y]) % $p

  # Return the new point¢ªº
  return { x: x, y: y }
end

# Add: add two points together
def add(point1, point2)
  # double if both points are the same
  if point1 == point2
    return double(point1)
  end

  # check for point at infinity (greatest common divisor between x1-x2 and p isn't 1)
  if ((point1[:x] - point2[:x]).gcd($p) != 1) # taken from BitcoinECDSA.php
    raise "Point at infinity."
  end

  # slope = (y₁ - y₂) / (x₁ - x₂)
  slope = ((point1[:y] - point2[:y]) * inverse(point1[:x] - point2[:x], $p)) % $p

  # x = slope² - x₁ - x₂
  x = (slope ** 2 - point1[:x] - point2[:x]) % $p

  # y = slope * (x₁ - x) - y₁
  y = ((slope * (point1[:x] - x)) - point1[:y]) % $p

  # Return the new point
  return { x: x, y: y }
end

# Multiply: use double and add operations to quickly multiply a point by an integer value (i.e. a private key)
def multiply(k, point = $G)
  # create a copy the initial starting point (for use in addition later on)
  current = point

  # convert integer to binary representation
  binary = k.to_s(2)

  # double and add algorithm for fast multiplication
  binary.split("").drop(1).each do |char| # from left to right, ignoring first binary character
    # 0 = double
    current = double(current)

    # 1 = double and add
    current = add(current, point) if char == "1"
  end

  # return the final point
  current
end

# ---------
# Functions
# ---------
# helper functions

# convert hexadecimal string of bytes to integer
def int(bytes)
  return bytes.to_i(16)
end

# convert integer to hexadecimal string of bytes
def bytes(int)
  return int.to_s(16).rjust(64, "0") # convert to hex and pad with zeros to make it 32 bytes (64 characters)
end

# -----------
# Tagged Hash
# -----------
require "digest" # library for SHA256 hash function

# hash some data using SHA256 with a tag prefix
def tagged_hash(tag, message)

  # create a hash of the tag first
  tag_hash = Digest::SHA256.hexdigest(tag) # hash the string directly

  # prefix the message with the tag hash (the tag_hash is prefixed twice so that the prefix is 64 bytes in total)
  preimage = [tag_hash + tag_hash + message].pack("H*") # also convert to byte sequence before hashing

  # SHA256(tag_hash || tag_hash || message)
  result = Digest::SHA256.hexdigest(preimage);

  return result
end

# ----
# Keys
# ----
# Example private key (in hexadecimal)
private_key = "b7e151628aed2a6abf7158809cf4f3c762e7160f38b4da56a784d9045190cfef"

# Public key is the generator point multiplied by the private key
point = multiply(int(private_key))

# the public key is just the x value of this point
public_key = bytes(point[:x]) # convert x coordinate to hex bytes

#puts public_key #=> dff1d77f2a671c5f36183726db2341be58feae1da2deced843240f7b502ba659

# ----
# Sign
# ----
puts "Signing:"

private_key = "b7e151628aed2a6abf7158809cf4f3c762e7160f38b4da56a784d9045190cfef"
aux_rand = "0000000000000000000000000000000000000000000000000000000000000001" # auxiliary bytes for contributing to randomness of the nonce (security does not rely on this being random)
message = "243f6a8885a308d313198a2e03707344a4093822299f31d0082efa98ec4e6c89"

puts " private key: #{private_key}"
puts " aux rand:    #{aux_rand}"
puts " message:     #{message}"

# convert private key to an integer
d0 = int(private_key)

# make sure private key is in valid range (greater than 0 and less than the number of points on the curve)
unless (1..$n-1).include?(d0)
  raise "private key must be in the range 1..n-1"
end

# calculate the public key point from the private key
public_key_point = multiply(d0) # multiply() checks for point at infinity

# negate the private key if the public key it creates doesn't have an even y value, else keep the private key the same
# note: due to the way the elliptic curve works, negate the private key will produce a public key with the same x coordinate, but the opposite y value
if public_key_point[:y] % 2 != 0
  d = $n - d0
else
  d = d0
end

# create a tagged hash of the auxiliary bytes
aux_rand_hash = tagged_hash("BIP0340/aux", aux_rand)

# first step toward creating the nonce is to XOR the private key with the hash of the auxiliary bytes
t = d ^ int(aux_rand_hash)

# create the nonce by hashing t (from the previous step) along with the public_key and message
k0 = int(tagged_hash("BIP0340/nonce", bytes(t) + bytes(public_key_point[:x]) + message)) % $n # public key is included in hash for "key-prefixed" schnorr signatures

# check that the nonce isn't zero
if k0 == 0
  raise "nonce must not be zero (this is almost impossible, but checking anyway)"
end

# use this nonce to get a point on the curve
random_point = multiply(k0) # multiply() checks for point at infinity

# negate the nonce used to create the random point if the public key it creates doesn't have an even y value
if random_point[:y] % 2 != 0
  k = $n - k0
  # note: due to the way the elliptic curve works, the inverse private key will produce an even y value
else
  k = k0
end

# create the challenge e value by hashing the random point with the public key and message
e = int(tagged_hash("BIP0340/challenge", bytes(random_point[:x]) + bytes(public_key_point[:x]) + message)) % $n

# r value is the x-coordinate of point R
r =  random_point[:x]

# s value: (k + e*d) mod n
s = (k + e * d) % $n # this is linear (whereas s in ECDSA is non-linear)

# signature is the r and s values converted to 32-byte hexadecimal string and concatenated
sig = bytes(r) + bytes(s)

# you should check the signature verifies before returning it
puts "              ↓"
puts " signature:   #{sig}" #=> 6896bd60eeae296db48a229ff71dfe071bde413e6d43f917dc8dcf8c78de33418906d11ac976abccb20b091292bff4ea897efcb639ea871cfa95f6de339e4b0a
puts

# ------
# Verify
# ------
puts "Verifying:"

public_key = "dff1d77f2a671c5f36183726db2341be58feae1da2deced843240f7b502ba659"
message = "243f6a8885a308d313198a2e03707344a4093822299f31d0082efa98ec4e6c89"
sig = "6896bd60eeae296db48a229ff71dfe071bde413e6d43f917dc8dcf8c78de33418906d11ac976abccb20b091292bff4ea897efcb639ea871cfa95f6de339e4b0a"

puts " public key:  #{public_key}"
puts " message:     #{message}"
puts " signature:   #{sig}"

# convert public key (x coordinate only) in to a point - lift_x() in BIP 340
x = int(public_key) # convert from x coordinate from hex to an integer
y_sq = (x**3 + 7) % $p # use the elliptic curve equation (y² = x³ + ax + b) to work out the value of y from x
y = y_sq.pow(($p+1)/4, $p) # secp256k1 is chosen in a special way so that the square root of y is y^((p+1)/4)

# check that x coordinate is less than the field size
if x >= $p
  raise "x value in public key is not a valid coordinate because it is not less than the elliptic curve field size"
end

# verify that the computed y value is the square root of y_sq (otherwise the public key was not a valid x coordinate on the curve)
if (y**2) % $p != y_sq
  raise "public key is not a valid x coordinate on the curve"
end

# if the calculated y value is odd, negate it to get the even y value instead (for this x-coordinate)
if y % 2 != 0
  y = $p - y
end

# public key point
public_key_point = {x: x, y: y}

# extract r value from the signature and convert to an integer
r = sig[0..63] # first 32 bytes (64 characters)

# extract s value from the signature and convert to an integer
s = sig[64..-1] # last 32 bytes (64 characters)

# check that r is less than the field size
if int(r) >= $p
  raise "r value in signature is not less than the elliptic curve field size"
end

# check that s is less than the number of points on the curve (order)
if int(s) >= $n
  raise "s value in signature is not less than the number of points on the elliptic curve"
end

# create the challenge e by hashing the random point with the public key and message (same as during signing)
e = tagged_hash("BIP0340/challenge", r + bytes(x) + message).to_i(16) % $n # converting the x coordinate integer to 32-byte hexadecimal string

# create a point on the curve by multiplying the generator point by s
point1 = multiply(int(s), $G)

# create another point on the curve by multiplying the public key point by e
point2 = multiply($n - e, public_key_point) # note: we use ($n - e) so that the point addition in following step is subtraction instead (i.e. point1 - point2)

# add these points to get calculate a third point (R)
point3 = add(point1, point2) # add() checks for point at infinity

# check R has even y value
if point3[:y] % 2 != 0
  raise "calculated R during signature verification has an odd y value (it should be even)"
end

# signature verification: check that the third point calculated matches the x coordinate of the random point (r) given in the signature
puts "              ↓"
puts " result:      success" if point3[:x] == int(r)
puts " result:      fail" if point3[:x] != int(r)
实现
如何创建 Schnorr 签名?
首先,Schnorr 签名使用椭圆曲线密码学。在实现 Schnorr 签名之前,没有必要非得去弄懂椭圆曲线数学,但搞懂它会有所帮助。
无论如何,Schnorr 签名使用与 ECDSA 相同的 Secp256k1 椭圆曲线:
Secp256k1 参数
# y² = x³ + ax + b
$a = 0
$b = 7

# prime field
$p = 115792089237316195423570985008687907853269984665640564039457584007908834671663 #=> 0xFFFFFFFFFFFFFFFFFFFFFFFFFFFFFFFFFFFFFFFFFFFFFFFFFFFFFFFEFFFFFC2F

# number of points on the curve we can hit ("order")
$n = 115792089237316195423570985008687907852837564279074904382605163141518161494337 #=> 0xFFFFFFFFFFFFFFFFFFFFFFFFFFFFFFFEBAAEDCE6AF48A03BBFD25E8CD0364141

# generator point (the starting point on the curve used for all calculations)
$G = {
  x: 55066263022277343669578718895168534326250603453777594175500187360389116729240, #=> 0x79BE667EF9DCBBAC55A06295CE870B07029BFCDB2DCE28D959F2815B16F81798
  y: 32670510020758816978083085130507043184471273380659243275938904335757337482424, #=> 0x483ADA7726A3C4655DA4FBFC0E1108A8FD17B448A68554199C47D08FFB10D4B8
}
此外,您还需要能够在椭圆曲线上点乘(与 ECDSA 相同):
椭圆曲线数学
# Modular Inverse: Ruby doesn't have a built-in modinv function
def inverse(a, m = $p)
  m_orig = m         # store original modulus
  a = a % m if a < 0 # make sure a is positive
  y_prev = 0
  y = 1
  while a > 1
    q = m / a

    y_before = y # store current value of y
    y = y_prev - q * y # calculate new value of y
    y_prev = y_before # set previous y value to the old y value

    a_before = a # store current value of a
    a = m % a # calculate new value of a
    m = a_before # set m to the old a value
  end
  return y % m_orig
end

# Double: add a point to itself
def double(point)
  # check for point at infinity (greatest common divisor between 2y and p isn't 1)
  if (((2 * point[:y]) % $p).gcd($p) != 1) # taken from BitcoinECDSA.php
    raise "Point at infinity."
  end

  # slope = (3x₁² + a) / 2y₁
  slope = ((3 * point[:x] ** 2 + $a) * inverse((2 * point[:y]), $p)) % $p # using inverse to help with division

  # x = slope² - 2x₁
  x = (slope ** 2 - (2 * point[:x])) % $p

  # y = slope * (x₁ - x) - y₁
  y = (slope * (point[:x] - x) - point[:y]) % $p

  # Return the new point¢ªº
  return { x: x, y: y }
end

# Add: add two points together
def add(point1, point2)
  # double if both points are the same
  if point1 == point2
    return double(point1)
  end

  # check for point at infinity (greatest common divisor between x1-x2 and p isn't 1)
  if ((point1[:x] - point2[:x]).gcd($p) != 1) # taken from BitcoinECDSA.php
    raise "Point at infinity."
  end

  # slope = (y₁ - y₂) / (x₁ - x₂)
  slope = ((point1[:y] - point2[:y]) * inverse(point1[:x] - point2[:x], $p)) % $p

  # x = slope² - x₁ - x₂
  x = (slope ** 2 - point1[:x] - point2[:x]) % $p

  # y = slope * (x₁ - x) - y₁
  y = ((slope * (point1[:x] - x)) - point1[:y]) % $p

  # Return the new point
  return { x: x, y: y }
end

# Multiply: use double and add operations to quickly multiply a point by an integer value (i.e. a private key)
def multiply(k, point = $G)
  # create a copy the initial starting point (for use in addition later on)
  current = point

  # convert integer to binary representation
  binary = k.to_s(2)

  # double and add algorithm for fast multiplication
  binary.split("").drop(1).each do |char| # from left to right, ignoring first binary character
    # 0 = double
    current = double(current)

    # 1 = double and add
    current = add(current, point) if char == "1"
  end

  # return the final point
  current
end
密钥对
要创建和验证 Schnorr 签名,您首先需要生成一对密钥。
1. 私钥 (Private Key)
私钥是一个随机生成的 256 位数字。
这通常表示为 32 字节的十六进制字符串:
![]() 私钥 (Private Key)
私钥 (Private Key)
随机生成 (Generate Random) 重置 (Reset)
Bits
0
0
0
0
0
0
0
0
0
0
0
0
0
0
0
0
0
0
0
0
0
0
0
0
0
0
0
0
0
0
0
0
0
0
0
0
0
0
0
0
0
0
0
0
0
0
0
0
0
0
0
0
0
0
0
0
0
0
0
0
0
0
0
0
0
0
0
0
0
0
0
0
0
0
0
0
0
0
0
0
0
0
0
0
0
0
0
0
0
0
0
0
0
0
0
0
0
0
0
0
0
0
0
0
0
0
0
0
0
0
0
0
0
0
0
0
0
0
0
0
0
0
0
0
0
0
0
0
0
0
0
0
0
0
0
0
0
0
0
0
0
0
0
0
0
0
0
0
0
0
0
0
0
0
0
0
0
0
0
0
0
0
0
0
0
0
0
0
0
0
0
0
0
0
0
0
0
0
0
0
0
0
0
0
0
0
0
0
0
0
0
0
0
0
0
0
0
0
0
0
0
0
0
0
0
0
0
0
0
0
0
0
0
0
0
0
0
0
0
0
0
0
0
0
0
0
0
0
0
0
0
0
0
0
0
0
0
0
0
0
0
0
0
0
0
0
0
0
0
0
0
0
0
0
0
0
0
0
0
0
0
0
0
0
0
0
0
0
0
0
0
0
Binary
0b
0 bits
Decimal
0d
Hexadecimal
0x
0 bytes
切勿使用由网站生成的私钥,或在网站中输入您的私钥。 网站很容易保存私钥并用其盗取您的比特币。
0 秒
这与您在比特币中生成的任何其他私钥都是相同的。
有效的私钥范围是 1..n-1,其中 n 是 Secp256k1 椭圆曲线上的点数(参见参数)。因此私钥实际上略小于可能的最大 256 位数字。您不太可能会生成一个超出该范围的 256 位私钥,但应该总是检查一下。
2. 公钥 (Public Key)
公钥是通过将椭圆曲线上的基点点乘私钥来创建的。
例如:
public key = {
  x: 94143704248521553317086831157498059579898345832673799690735511018320990355030,
  y: 44438543306112247703620323006762464482367802894269621488396118668492541437765,
}
![]() 公钥 (Public Key)
公钥 (Public Key)
随机生成 (Generate Random)
私钥 (Private Key)
0 bytes
公钥 (Public Key)
坐标 (Coordinates)
x:
0d
y:
0d
奇偶性 (parity):
公钥只是椭圆曲线上的一个点。最终的公钥是这些十六进制坐标。
压缩方式
压缩格式 (以 02 或 03 开头)
未压缩格式 (以 04 开头)
仅含 x 轴 (无前缀)
椭圆曲线沿 x 轴对称,因此压缩的公钥只需要存储完整的 x 坐标以及 y 坐标是奇数还是偶数即可。
在 Taproot 输出中使用仅含 x 轴的公钥。相应的 y 坐标默认假定为偶数。
0 bytes
切勿在网站中输入您的私钥,或使用由网站生成的私钥。 网站很容易保存私钥并用其盗取您的比特币。
0 秒
这与您生成其他公钥的方式是相同的。
然而,在比特币中使用 Schnorr 签名时,编码的公钥仅为 x 坐标,表示为 32 字节的十六进制字符串:
比特币中 Schnorr 签名的公钥总是使用 偶数 (even) y 坐标。因此,编码的公钥中不包含关于 y 坐标正负号的信息。
您可以将典型的压缩公钥转换为用于 Schnorr 签名的公钥,只需删除第一个字节(该字节用于指示 y 坐标的极性):
compressed public key = 03d02372c4789c6a1d6cf6cf137cc708153a4dbf70ec3ecd0b578476c5a2b4be56
schnorr public key    =   d02372c4789c6a1d6cf6cf137cc708153a4dbf70ec3ecd0b578476c5a2b4be56
密钥对代码
此代码片段需要上述 Secp256k1 参数和椭圆曲线数学代码。
# ---------
# Functions
# ---------
# helper functions

# convert hexadecimal string of bytes to integer
def int(bytes)
  return bytes.to_i(16)
end

# convert integer to hexadecimal string of bytes
def bytes(int)
  return int.to_s(16).rjust(64, "0") # convert to hex and pad with zeros to make it 32 bytes (64 characters)
end

# ----
# Keys
# ----
# Example private key (in hexadecimal)
private_key = "b7e151628aed2a6abf7158809cf4f3c762e7160f38b4da56a784d9045190cfef"

# Public key is the generator point multiplied by the private key
point = multiply(int(private_key))

# the public key is just the x value of this point
public_key = bytes(point[:x]) # convert x coordinate to hex bytes

#puts public_key #=> dff1d77f2a671c5f36183726db2341be58feae1da2deced843240f7b502ba659
签名 (Sign)
随机示例
私钥 (Private Key) (d')
0x
随机 (Random)
0 bytes
辅助字节 (Auxiliary Bytes) (aux_rand)
0x
+1
随机 (Random)
0 bytes
消息 (Message) (m)
0x
0 bytes
详情 (Details)
公钥 (Public Key) (P) = d'G
x:
0x
y:
0x
私钥 (Private Key) (d) = (n - d') (如果 P[y] 是奇数的话)
0x
私有 Nonce
aux_rand_hash = hashBIP0340/aux(aux_rand)
0x
t = d XOR aux_rand_hash
0x
k' = int(hashBIP0340/nonce(t || P[x] || m)) % n
0x
0
0
0
0
0
0
0
0
0
0
0
0
0
0
0
0
0
0
0
0
0
0
0
0
0
0
0
0
0
0
0
0
0
0
0
0
0
0
0
0
0
0
0
0
0
0
0
0
0
0
0
0
0
0
0
0
0
0
0
0
0
0
0
0
0
0
0
0
0
0
0
0
0
0
0
0
0
0
0
0
0
0
0
0
0
0
0
0
0
0
0
0
0
0
0
0
0
0
0
Binary
0b
0 bits
Decimal
0d
Hexadecimal
0x
0 bytes
切勿使用由网站生成的私钥,或在网站中输入您的私钥。 网站很容易保存私钥并用其盗取您的比特币。
0 秒
- 私有 Nonce (
k) 用于隐藏我们的私钥 (d)。 - 挑战 (
e) 是必不可少的,用于向验证者证明我们在创建签名时没有作弊。
最后,我们将这两个 r 和 s 值转换为 32 十六进制字节,并将其拼接以创建我们完整的 64 字节编码签名:
signature = (r, s)
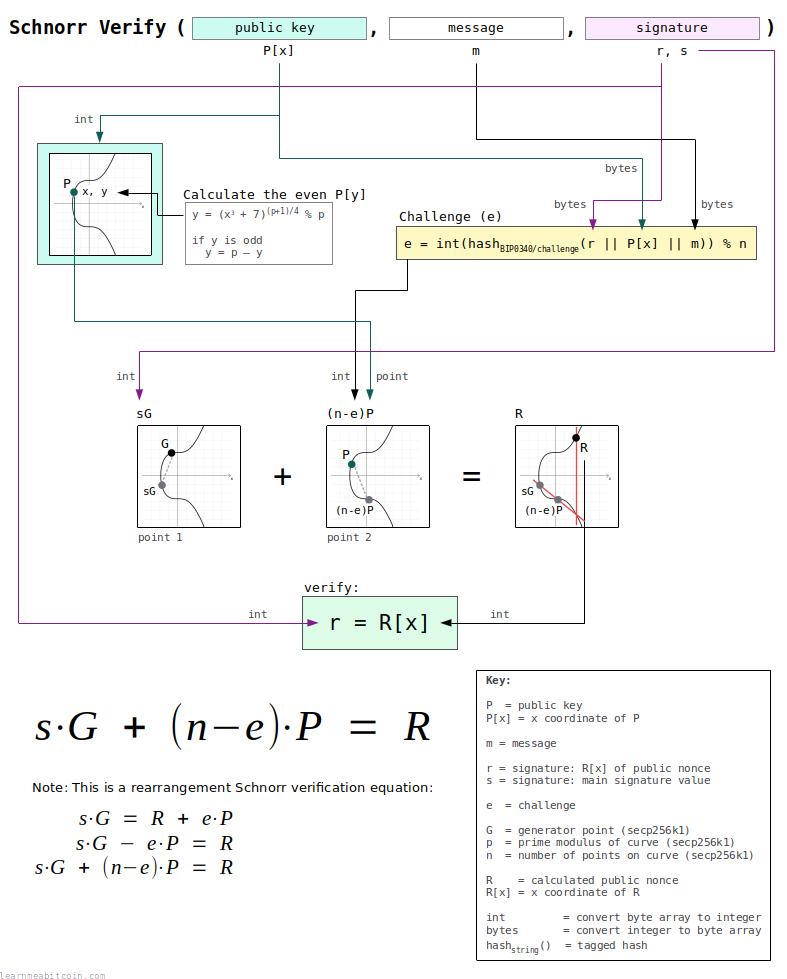
验证 (Verify)
随机示例
公钥 (Public Key) (P[x])
0x
随机 (Random)
0 bytes
消息 (Message) (m)
0x
随机 (Random)
0 bytes
签名 (Signature) (r, s)
0x
0 bytes
详情 (Details)
公钥 (Public Key) (P)
x:
0d
y:
0d
签名 (Signature)
r:
0d
s:
0d
点 1 (Point 1) = sG
x:
0d
y:
0d
挑战 (Challenge) (e) = int(hashBIP0340/challenge(r || P[x] || m)) % n
0d
(n - e)
0d
点 2 (Point 2) = (n-e)P
x:
0d
y:
0d
R = sG + (n-e)P
x:
0d
y:
0d
验证 (Verify) (r = R[x])
r:
0d
R[x]:
0d
0 秒
验证代码
此代码片段需要上述 Secp256k1 参数和椭圆曲线数学代码。
# ---------
# Functions
# ---------
# helper functions

# convert hexadecimal string of bytes to integer
def int(bytes)
  return bytes.to_i(16)
end

# convert integer to hexadecimal string of bytes
def bytes(int)
  return int.to_s(16).rjust(64, "0") # convert to hex and pad with zeros to make it 32 bytes (64 characters)
end

# -----------
# Tagged Hash
# -----------
require "digest" # library for SHA256 hash function

# hash some data using SHA256 with a tag prefix
def tagged_hash(tag, message)

  # create a hash of the tag first
  tag_hash = Digest::SHA256.hexdigest(tag) # hash the string directly

  # prefix the message with the tag hash (the tag_hash is prefixed twice so that the prefix is 64 bytes in total)
  preimage = [tag_hash + tag_hash + message].pack("H*") # also convert to byte sequence before hashing

  # SHA256(tag_hash || tag_hash || message)
  result = Digest::SHA256.hexdigest(preimage);

  return result
end

# ------
# Verify
# ------
puts "Verifying:"

public_key = "dff1d77f2a671c5f36183726db2341be58feae1da2deced843240f7b502ba659"
message = "243f6a8885a308d313198a2e03707344a4093822299f31d0082efa98ec4e6c89"
sig = "6896bd60eeae296db48a229ff71dfe071bde413e6d43f917dc8dcf8c78de33418906d11ac976abccb20b091292bff4ea897efcb639ea871cfa95f6de339e4b0a"

puts " public key:  #{public_key}"
puts " message:     #{message}"
puts " signature:   #{sig}"

# convert public key (x coordinate only) in to a point - lift_x() in BIP 340
x = int(public_key) # convert from x coordinate from hex to an integer
y_sq = (x**3 + 7) % $p # use the elliptic curve equation (y² = x³ + ax + b) to work out the value of y from x
y = y_sq.pow(($p+1)/4, $p) # secp256k1 is chosen in a special way so that the square root of y is y^((p+1)/4)

# check that x coordinate is less than the field size
if x >= $p
  raise "x value in public key is not a valid coordinate because it is not less than the elliptic curve field size"
end

# verify that the computed y value is the square root of y_sq (otherwise the public key was not a valid x coordinate on the curve)
if (y**2) % $p != y_sq
  raise "public key is not a valid x coordinate on the curve"
end

# if the calculated y value is odd, negate it to get the even y value instead (for this x-coordinate)
if y % 2 != 0
  y = $p - y
end

# public key point
public_key_point = {x: x, y: y}

# extract r value from the signature and convert to an integer
r = sig[0..63] # first 32 bytes (64 characters)

# extract s value from the signature and convert to an integer
s = sig[64..-1] # last 32 bytes (64 characters)

# check that r is less than the field size
if int(r) >= $p
  raise "r value in signature is not less than the elliptic curve field size"
end

# check that s is less than the number of points on the curve (order)
if int(s) >= $n
  raise "s value in signature is not less than the number of points on the elliptic curve"
end

# create the challenge e by hashing the random point with the public key and message (same as during signing)
e = tagged_hash("BIP0340/challenge", r + bytes(x) + message).to_i(16) % $n # converting the x coordinate integer to 32-byte hexadecimal string

# create a point on the curve by multiplying the generator point by s
point1 = multiply(int(s), $G)

# create another point on the curve by multiplying the public key point by e
point2 = multiply($n - e, public_key_point) # note: we use ($n - e) so that the point addition in following step is subtraction instead (i.e. point1 - point2)

# add these points to get calculate a third point (R)
point3 = add(point1, point2) # add() checks for point at infinity

# check R has even y value
if point3[:y] % 2 != 0
  raise "calculated R during signature verification has an odd y value (it should be even)"
end

# signature verification: check that the third point calculated matches the x coordinate of the random point (r) given in the signature
puts "              ↓"
puts " result:      success" if point3[:x] == int(r)
puts " result:      fail" if point3[:x] != int(r)
批量验证 (Batch Verify)
1. 获取批量验证所需的所有数据。
2. 为每个三元组生成一个随机数 (ai)。
3. 执行批量验证。
1. 计算方程的左侧。
2. 计算方程的右侧
3. 检查方程的左侧是否等于右侧。
设计
比特币中如何实现 Schnorr 签名?
比特币中的 Schnorr 签名实现包括对基本 Schnorr 签名方案的一些修改。
这些是针对比特币特有的微调;底层的数学原理仍是一样的。
我对比特币密码学的了解还不够深入,无法解释比特币中 Schnorr 签名实现背后每个设计决定的技术细节,因此我给出了一个简单的概述,说明为什么它们要被这样实现。
1. 公钥编码
在比特币中使用 Schnorr 签名时,公钥仅被编码为 32 字节的 x 坐标。
与使用 33 字节的压缩公钥或 65 字节的未压缩公钥相比,这节省了空间。
原因在于我们实际上不需要 y 坐标,因为对于任何给定的 x 坐标,只有两个可能的 y 坐标:
- 偶数 y 坐标
- 奇数 y 坐标

当重构完整的公钥时,我们始终使用这两者之中的偶数 y 坐标。
因此,对于任何给定的公钥 x 坐标,我们使用椭圆曲线方程(y² = x³ + 7)计算出两个潜在的 y 坐标,然后从中选择偶数的一个,即可得到公钥的完整 (x, y) 坐标。
代码
# -------------------------
# Elliptic Curve Parameters
# -------------------------

# prime field
$p = 115792089237316195423570985008687907853269984665640564039457584007908834671663

# ---------
# Functions
# ---------

# convert hexadecimal string of bytes to integer
def int(bytes)
  return bytes.to_i(16)
end

# ------------------------------
# Decompress Public Key (lift_x)
# ------------------------------

# encoded public key (32-byte x-coordinate only)
public_key = "dff1d77f2a671c5f36183726db2341be58feae1da2deced843240f7b502ba659"

# calculate one of the possible y values from the x coordinate
x = int(public_key) # convert from x coordinate from hex to an integer
y_sq = (x**3 + 7) % $p # use the elliptic curve equation (y² = x³ + 7) to work out the value of y from x
y = y_sq.pow(($p+1)/4, $p) # secp256k1 is chosen in a special way so that the square root of y is y^((p+1)/4)

# check that x coordinate is less than the field size
if x >= $p
  raise "x value in public key is not a valid coordinate because it is not less than the elliptic curve field size"
end

# verify that the computed y value is the square root of y_sq (otherwise the public key was not a valid x coordinate on the curve)
if (y**2) % $p != y_sq
  raise "public key is not a valid x coordinate on the curve"
end

# show current x and y value (this y value is odd, but sometimes it will already be even)
puts "x: #{x}" #=> 101293062680523315514373137351023114440902235251657644508821325047911886333529
puts "y: #{y}" #=> 95491709537915294920828256998521669146617750390665870859237534620269297521559

# if the calculated y value is odd, negate it to get the even y value instead (for this x-coordinate)
if y % 2 != 0
  y = $p - y
end

# show even y value
puts "y: #{y}" #=> 20300379699400900502742728010166238706652234274974693180220049387639537150104
从 x 坐标求出 y 坐标的初始方法与解压公钥时相同。
- 每次使用偶数 y 坐标意味着我们在签名验证过程中无需尝试两种可能的 y 坐标。
- 从编码的公钥计算出完整的公钥点 (x, y) 需要一个额外的计算步骤,但为了在区块链中为每个公钥节省 1 字节的空间,这被认为是值得的。
- 签名中的
r值(一个随机点)同样也被编码为仅含 x 坐标。
这难道不会降低签名方案的安全性吗?
既然我们对每个公钥都只使用其偶数 y 坐标,这确实意味着两个不同的私钥会产生相同的编码公钥。
例如:
private_key_1 = b7e151628aed2a6abf7158809cf4f3c762e7160f38b4da56a784d9045190cfef
private_key_2 = 481eae9d7512d595408ea77f630b0c3757c7c6d77693c5e5184d85887ea57152

private_key_1_encoded_public_key = dff1d77f2a671c5f36183726db2341be58feae1da2deced843240f7b502ba659
private_key_2_encoded_public_key = dff1d77f2a671c5f36183726db2341be58feae1da2deced843240f7b502ba659
![]() 公钥 (Public Key)
公钥 (Public Key)
随机生成 (Generate Random)
私钥 (Private Key)
0 bytes
公钥 (Public Key)
坐标 (Coordinates)
x:
0d
y:
0d
奇偶性 (parity):
公钥只是椭圆曲线上的一个点。最终的公钥是这些十六进制坐标。
压缩方式
压缩格式 (以 02 或 03 开头)
未压缩格式 (以 04 开头)
仅含 x 轴 (无前缀)
椭圆曲线沿 x 轴对称,因此压缩的公钥只需要存储完整的 x 坐标以及 y 坐标是奇数还是偶数即可。
在 Taproot 输出中使用仅含 x 轴的公钥。相应的 y 坐标默认假定为偶数。
0 bytes
切勿在网站中输入您的私钥,或使用由网站生成的私钥。 网站很容易保存私钥并用其盗取您的比特币。
0 秒
此示例中的第二个私钥是第一个私钥的加法逆元(即我通过从曲线上的点数中减去它来使其取负值)。该“反转”的私钥为公钥生成完全相同的 x 坐标,但带相反的 y 坐标。
然而,有些令人惊讶的是,两个私钥生成同一个公钥的事实并不会削弱比特币中 Schnorr 签名的安全性。
2. 键前缀 (Key-Prefixing)
在标准 Schnorr 签名方案中,通过将公有 Nonce (kG) 与消息 (m) 进行哈希运算来创建挑战 (e):
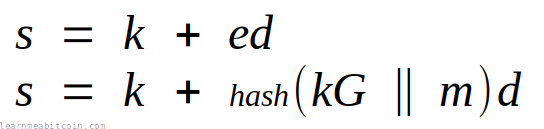
然而,在比特币中,该哈希还包含了公钥的 x 坐标 (Px):

这被称为键前缀 (key-prefixing),引入它是为了在 HD 钱包中从非硬分叉公钥生成签名时防止相关攻击。
此键前缀同样在生成私有 Nonce 时被使用。
3. 标记哈希 (Tagged Hashes)
![]() 标记哈希 (Tagged Hash)
标记哈希 (Tagged Hash)
随机示例
字符串 (String)
BIP0340/aux BIP0340/nonce BIP0340/challenge
TapLeaf TapBranch TapTweak TapSighash
Data (Hex)
0 bytes
结果 (Result)
SHA256(SHA256(string) || SHA256(string) || data)
0 bytes
0 秒
标记哈希是带有额外标记前缀的数据哈希值。这种哈希方法是作为比特币 Schnorr 签名实现的一部分被引入的。
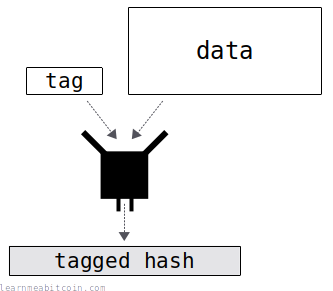
这为每个哈希值提供了一个上下文 (context),因此如果您在不同上下文中对相同数据进行哈希,您将不会获得相同的哈希结果。
在比特币中创建标记哈希相当简单:
- 对一个描述该最终哈希上下文的字符串(标记 (tag))进行哈希运算。
- 将该标记哈希作为前缀,拼接数据后再进行哈希(该标记哈希前缀需要拼接两次)。

代码
# -----------
# Tagged Hash
# -----------
require "digest" # library for SHA256 hash function

# hash some data using SHA256 with a tag prefix
def tagged_hash(tag, message)

  # create a hash of the tag first
  tag_hash = Digest::SHA256.hexdigest(tag) # hash the string directly

  # prefix the message with the tag hash (the tag_hash is prefixed twice so that the prefix is 64 bytes in total)
  preimage = [tag_hash + tag_hash + message].pack("H*") # also convert to byte sequence before hashing

  # SHA256(tag_hash || tag_hash || message)
  result = Digest::SHA256.hexdigest(preimage);

  return result
end
为什么标记哈希的前缀要拼接两次?
标记哈希的创建方式如下:
如果我们仅仅将 SHA256(string)(32 字节)作为标记会更简单,但在创建标记哈希时,使用 SHA256(string) || SHA256(string)(64 字节)允许进行效率优化。
您可以看到,SHA256 哈希算法是通过将输入数据划分为 64 字节的数据块来工作的。它在每个 64 字节的数据块上执行一轮哈希,然后将每轮的结果叠加以产生最终的哈希结果。
因此,通过使用 SHA256(string) || SHA256(string),我们创建了一个长度恰好为 64 字节的前缀,这意味着在第一轮哈希过程中它恰好装入第一个消息块中。因此,对于每个标记哈希,我们可以预先计算出第一个消息块(标记前缀)的哈希结果,并将其用作哈希算法内的起点。
换句话说,使用 64 字节的前缀允许我们在创建标记哈希时跳过第一轮哈希。
这是一个相当底层的优化,在您自己的代码中并不必须使用(除非对速度有极高要求)。尽管如此,能获得更高效率的可能,正是我们将标记前缀构建为恰好 64 字节长度的原因。
4. Nonce 生成
您创建的每个签名都需要包含一个随机 Nonce (k)。
在大多数签名方案中(例如 ECDSA),该 Nonce 仅仅是一个随机生成的数字。但在比特币的 Schnorr 签名实现中,我们使用一种特定方法来生成每个 Nonce。
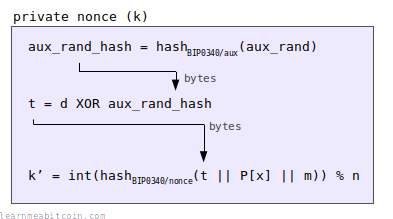
简而言之:
- 私钥 (
d) 被用作起始“种子 (seed)”。 - 该私钥与某些辅助字节的标记哈希 (
aux_rand_hash) 进行 XOR 异或运算,以创建修改后的私钥 (t)。 - 随机 Nonce (
k) 则是对修改后的私钥 (t)、公钥 (Px) 和消息 (m) 进行标记哈希所得的结果。
这种生成 Nonce 的方案使得整个 Schnorr 签名实现看起来比实际情况要吓人得多。然而,以这种方式设计 Nonce 生成部分是为了使其更安全(因为您无需依赖外部随机源的可靠性),同时还能防范特定类型的攻击。
我对比特币密码学的了解还不够深入,无法完全解释该特定设计背后的精妙原因,因此这里有一些您可能会觉得有用的链接:
- k selection for Schnorr signatures — 对该方案背后原因的初步解释。
- [bitcoin-dev] Mitigating Differential Power Analysis in BIP-340 — 对该方案背后原因的总结。
- Discussion on power analysis attacks — 包含 Nonce 生成方案背后的思考过程。
简而言之,它可能看起来很复杂,但这样设计是有其原因的。
5. 签名编码
通过拼接 32 字节的 r 值和 32 字节的 s 值来对 Schnorr 签名进行编码。
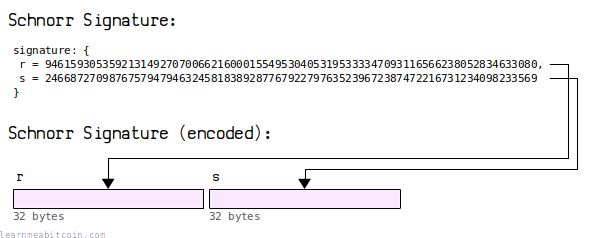
因此,Schnorr 签名长度始终为 64 字节。
Schnorr 与 ECDSA 签名编码对比
对于 ECDSA 签名,等效的 r 和 s 值被封装在 DER 编码中:
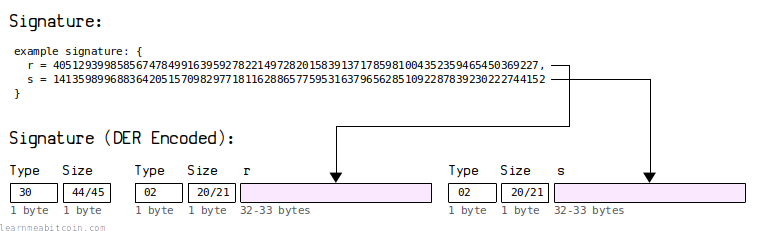
这种 DER 编码导致签名的长度在 70-72 字节之间变动。
在签名中使用 DER 编码一直以来都是低效的,因为 r 和 s 值的尺寸总是固定的,所以 DER 中使用的额外类型 (type)和尺寸 (size)字段是不必要的额外开销。这就是我们在 Schnorr 签名中摒弃它的原因。
结果,每个签名减少至少 6 字节将随时间推移为区块链节省大量空间。
中本聪当时可能使用 DER 编码是因为它是他们当时所用的 OpenSSL 库中编码签名的标准方法。它的低效在当时可能是一个疏忽。
优势
与 ECDSA 相比,使用 Schnorr 签名有哪些优势?
与 ECDSA 相比,使用 Schnorr 签名有许多优势:
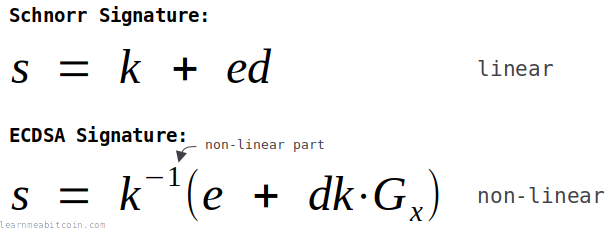
1. 简单性
Schnorr 签名方案在数学上比 ECDSA 更简单。
这是创建 Schnorr 签名的方程式:

这是创建 ECDSA 签名的方程式:

从数学的角度来看,Schnorr 签名更为合乎逻辑且更为优雅。
从实用的角度来看,它们也是可证明安全的且更高效。更好的是,Schnorr 签名方程是线性的,这意味着您可以将签名相加(这是您无法使用 ECDSA 完成的)。
2. 高效性
创建 Schnorr 签名的方程仅使用算术的加法和乘法:
另一方面,在 ECDSA 中创建签名的方程包含了 椭圆曲线乘法 和 模逆:

因此,Schnorr 签名在数学上更高效,计算速度也更快。
当然,在现代计算机上,ECDSA 中使用的椭圆曲线乘法和模逆运算都不算特别“慢”。但在创建 Schnorr 签名时无需执行这些运算,无论如何都带来效率上的提升。
Schnorr 签名的另一个效率优势在于,您可以使用批量验证同时验证多个签名。而在使用 ECDSA 时,您只能逐个验证签名。
3. 安全性
Schnorr 签名方程的简单性也意味着它是可证明安全的。
换句话说,有一个数学证明表明,除非您能解决离散对数问题,否则 Schnorr 签名是无法被破解的。
相比之下,ECDSA 中创建签名方程的复杂性意味着无法正式证明其安全性。这是由于引入了椭圆曲线乘法部分,使得形成数学证明非常困难:
有一个强烈的假设认为 ECDSA 是安全的,但并无实际的数学证明。因此拥有一个实际的安全证明是 Schnorr 签名的又一胜利。
离散对数问题
离散对数问题如下所示:
给定数字 a 和 b,以及一个质数 p,求解 k 的值。
这里有一个简单的例子:
求出 k 为 15 的唯一方法是逐个尝试 k 的所有可能值,直到找到一个可行的数字。求出 k 是没有数学捷径的,找到答案的唯一方法就是暴力破解:
3^1 mod 17 = 3
3^2 mod 17 = 9
3^3 mod 17 = 10
3^4 mod 17 = 13
3^5 mod 17 = 5
3^6 mod 17 = 15
3^7 mod 17 = 11
3^8 mod 17 = 16
3^9 mod 17 = 14
3^10 mod 17 = 8
3^11 mod 17 = 7
3^12 mod 17 = 4
3^13 mod 17 = 12
3^14 mod 17 = 2
3^15 mod 17 = 6    <- 找到了答案
在处理小数字时找到答案并不困难,但当您处理极大的数字时(如我们在密码学中所做的那样),求出 k 的值就会变得完全不可能。
例如,看看这次您能否求出 k 的值:
71916331368884415102528573409726749875552388602224548694948731024252851890102^k mod 115792089237316195423570985008687907853269984665640564039457584007908834671663 = 11790564026517817731571347968670053249854067159256829888660539131158964346271
我知道答案(因为方程是我创建的),但您永远无法反向计算出来。而这正是 Schnorr 签名安全性的基石。
答案
答案是:
但正如我所说,除非我告诉您,否则您永远无法算出答案(或者您拥有几十亿年的时间以暴力破解的方式去尝试)。
4. 线性特征 (Linearity)
Schnorr 签名具有线性特征,而 ECDSA 签名则没有:
这意味着您可以将 Schnorr 签名相加,而这在 ECDSA 中是无法做到的。
例如,您在 Schnorr 和 ECDSA 中都可以将公钥相加:
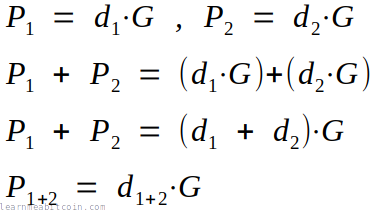
但您只能在 Schnorr 中将签名相加(因为它是线性的):
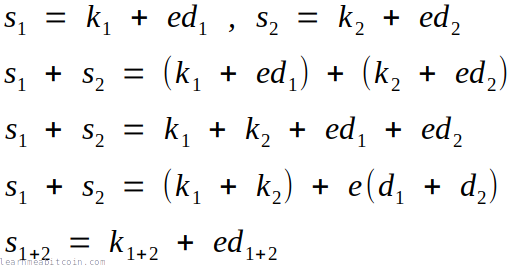
这种将 Schnorr 签名相加的能力允许您做一些有用的事情,例如批量验证,以及构建高效的多重签名锁定脚本。
基础多重签名示例
您可以将 Schnorr 签名相加的事实意味着,您可以生成一个对于多个公钥之和有效的单一签名。
例如,在传统的 P2MS 锁定脚本(使用 ECDSA)中,您必须在锁定脚本中提供每个单独的公钥。为了解锁它,您需要为每个公钥提供一个签名。

但在使用 Schnorr 签名时,您可以将所有公钥相加,创建一个“公钥之和 (public key sum)”并将其放入锁定脚本中。解锁时,您可以为每个公钥创建一个签名,然后将它们相加,并在解锁脚本中提供一个单一的“签名之和 (signature sum)”:

这带来了两个主要优势:
- 空间 — 您现在只需要提供一个单一的公钥(32 字节)和一个单一的签名(64 字节),而无需为每个签名提供多个。
- 速度 — 您现在只需要执行一次签名验证,而无需执行多次。
这是一个用于说明如何使用 Schnorr 签名设计多重签名脚本的简单示例。然而,这种基本设计容易受到“密钥取消 (key-cancellation)”攻击,因此需要进行一些额外的调整才能使其对比特币交易完全安全(参见 MuSig)。不过其底层的数学原理在本质上是相同的。
5. 非延展性 (Non-malleability)
Schnorr 签名是非延展性的,而 ECDSA 签名是具有延展性的。
- 具有延展性 (Malleable) — 您可以对签名做出调整,调整后的签名依然有效。
- 非延展性 (Non-malleable) — 您无法对签名做出任何更改,否则会导致其失效。
因此非延展性更为理想。
签名延展性在比特币的历史上一直是一个令人有些恼火的隐患,因为这意味着在您将交易发送到网络后,其 TXID 可以被他人修改。例如,矿工可以获取您的交易,对其中一个签名中的 s 值取反,最后交易的 TXID 就会变得不同。
这种“交易延展性 (transaction malleability)”并不是一个极其严重的隐患,因为交易仍会被打包开采,且比特币依然会发往相同的目的地。它只是意味着 TXID 不是 100% 可靠的,因此您无法在比特币之上构建任何依赖于交易发送到网络后 TXID 保持绝对不变的应用程序。
比特币中的交易延展性在很大程度上已通过 BIP 62(仅使用低 s 值)和 SegWit(签名不再影响 TXID)被“修补”,但在 ECDSA 中,底层算法层面的延展性仍然存在。
如果比特币从一开始就使用 Schnorr 签名,那么交易延展性永远不会成为一个问题。
ECDSA 与 Schnorr 延展性对比示例
在 ECDSA 中,您可以使用签名 s 值的加法逆元 (n - s),而签名依然有效:
ECDSA 签名延展性示例(有效):

# n 是 Secp256k1 椭圆曲线上的点数
n = 115792089237316195423570985008687907852837564279074904382605163141518161494337

message = ef5a8f37fccf71096afd9a11a2da2b446d8b33689f4d20e26c638f4a989531fe

签名 (signature)
r = 66877274282749947925738202103737060826792639332019467521650159742093834512161
s = 52838996486501912417250039507174624042914096621748978414744411801275148621923

被修改过的签名 (signature malleated)
r = 66877274282749947925738202103737060826792639332019467521650159742093834512161
n - s = 62953092750814283006320945501513283809923467657325925967860751340243012872414

public key = 03f8598d649e50f593c7fa78fa279e77deb5551e0983a06fecacbe4642f8e2aa49
![]() ECDSA 验证 (ECDSA Verify)
ECDSA 验证 (ECDSA Verify)
随机示例
消息哈希 (Message Hash) (z)
0x
0 bytes
签名 (Signature)
R:
0d
S:
0d
公钥 (Public Key) (Q)
0x
0 bytes
签名验证 (Signature Verification)
x:
0d
y:
0d
0 秒
然而,如果您对 Schnorr 签名尝试此操作,取反的 s 值 (n - s) 将不再是一个有效的签名:
Schnorr 签名延展性示例(无效):

# n 是 Secp256k1 椭圆曲线上的点数
n = 115792089237316195423570985008687907852837564279074904382605163141518161494337

public key = f8598d649e50f593c7fa78fa279e77deb5551e0983a06fecacbe4642f8e2aa49
message = ef5a8f37fccf71096afd9a11a2da2b446d8b33689f4d20e26c638f4a989531fe

签名 (signature):
r = 114044020606335199196415233777177936773828372395311453975809869274310626581346
s = 68385771140937257490418462830158146547018738395060108953065794598947526976254
sig = fc22a0d2d248490485a4d47bf85de155477068ad3fc8ba25e44e306c9ca91b629730f98d5acb8b510cdf78c3a710ddfd79e7445f3e1b6f8031371d2ab442a2fe

被修改过的签名 (signature malleated):
r = 114044020606335199196415233777177936773828372395311453975809869274310626581346
n - s = 47406318096378937933152522178529761305818825884014795429539368542570634518083
sig = fc22a0d2d248490485a4d47bf85de155477068ad3fc8ba25e44e306c9ca91b6268cf0672a53474aef320873c58ef220140c79887712d30bb8e9b41621bf39e43
![]() Schnorr 验证 (Schnorr Verify)
Schnorr 验证 (Schnorr Verify)
随机示例
公钥 (Public Key) (P[x])
0x
随机 (Random)
0 bytes
消息 (Message) (m)
0x
随机 (Random)
0 bytes
签名 (Signature) (r, s)
0x
0 bytes
详情 (Details)
公钥 (Public Key) (P)
x:
0d
y:
0d
签名 (Signature)
r:
0d
s:
0d
点 1 (Point 1) = sG
x:
0d
y:
0d
挑战 (Challenge) (e) = int(hashBIP0340/challenge(r || P[x] || m)) % n
0d
(n - e)
0d
点 2 (Point 2) = (n-e)P
x:
0d
y:
0d
R = sG + (n-e)P
x:
0d
y:
0d
验证 (Verify) (r = R[x])
r:
0d
R[x]:
0d
0 秒
基本原理
Schnorr 签名是如何工作的?
我想在此解释一下 Schnorr 签名是如何工作的,以及这些签署和验证的方程究竟是怎么来的:
我将从最基础的开始逐步讲解。
1. 密钥对
首先,为了能够创建一个数字签名,我需要生成一对密钥:
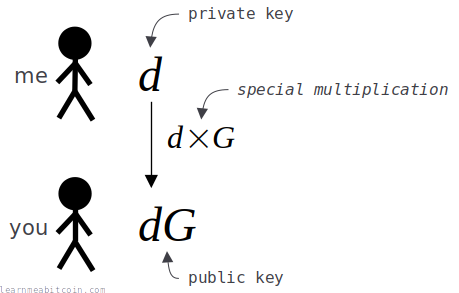
- 私钥 (
d) — 一个我需要保密的随机生成数字。 - 公钥 (
dG) — 我的私钥 (d) 乘以另一个数字 (G) 的结果。
我们已事先在数字 G 上达成一致。因此 d 是秘密的,但 G 并不是。
现在,虽然我将我的私钥 (d) 乘以数字 G 得到了公钥,但让我们假设在此并不能通过将公钥 (dG) 除以 G 来反向求得私钥 (d)。我知道这在普通的数学中是完全可行的,但假定我们使用了一种特殊的乘法,它以与普通乘法相同的方式工作,却不具备反向的“除法”运算。
而且请相信我,这种特殊的“点乘”运算在密码学中确实存在(我马上会讲到它)。
总之,因为我使用了这种特殊的“点乘”运算,我能够将我的公钥 (dG) 提供给您,而您却完全无法由此算出我的私钥 (d) 是什么。
这组密钥(以及特殊的“点乘”运算)是创建数字签名的起点。
目标
我的目标是向您证明,我确实拥有用于创建该公钥 (dG) 的对应私钥 (d),而无需透露该私钥的具体数值。
这一证明就将被称为我的数字签名 (s)。
2. Nonce
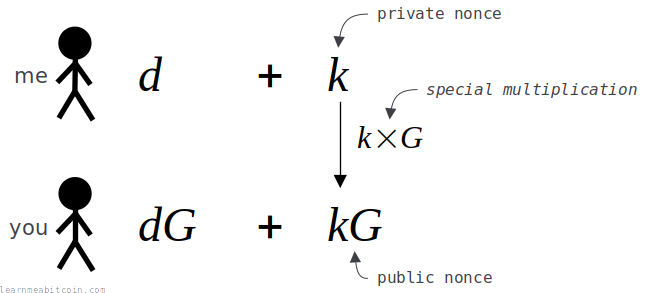
在创建数字签名之前,我需要生成一个一次性的随机数,称为 nonce (k)。
此 nonce 用于帮助我隐藏我的私钥,因为我在创建签名时会将其加到我的私钥中。
总之,为了能够验证签名,您也将需要了解关于此 nonce (k) 的某些信息,但我同样不想将其直接透露给您。因此,我将我的私有 nonce (k) 乘以数字 G,从而创建一个公有 nonce (kG)。
我将这个公有 nonce (kG) 发送给您,同样因为我们使用了与此前相同的特殊“点乘”函数,您无法从其反向求得我的私有 nonce (k)。
我需要为我创建的每一个签名使用一个不同的 nonce。 如果我多次使用同一个私有 nonce (k),您将能够推算出我的私钥 (d)。
3. 挑战 (Challenge)
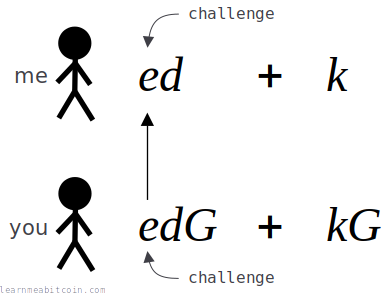
既然我已经向您发送了该公有 nonce (kG),我需要您想出一个挑战 (e) 数值并发送给我。
这个挑战 (e) 是一个由您生成的随机数,它将阻止我通过伪造签名的方式,假装自己知道私钥 (d),即使我实际并不知道。
我无法预先知道这个挑战数是多少,且既然我已经通过向您发送公有 nonce (kG) 承诺了要使用私有 nonce (k) 的数值,那么即使我不知道公钥 (dG) 对应的私钥 (d),我也不可能通过调整我的私有 nonce (k) 值的手段来制作出有效的签名了。
简而言之,挑战是为了确保我无法作弊。
4. 签名 (Signature)
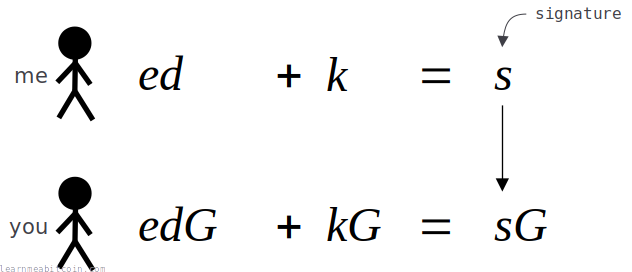
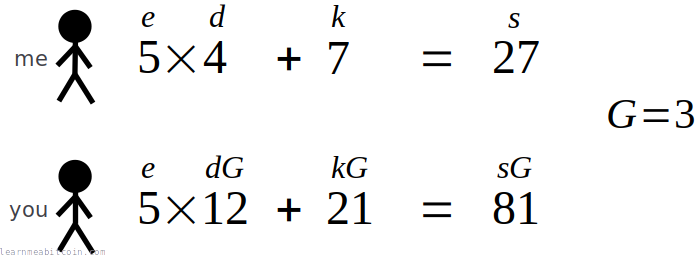
我通过将私钥 (d) 乘以挑战 (e),再加上私有 nonce (k) 来创建我的数字签名 (s)。
然后我将向您发送我的数字签名 (s)。
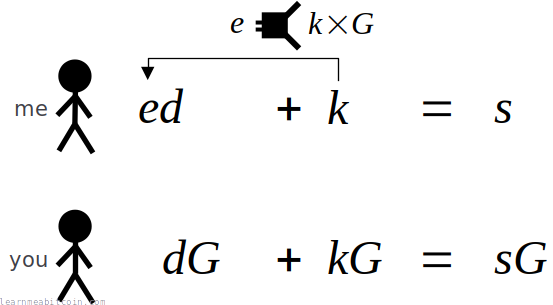
然后您也运行同一个方程。唯一的区别在于,您在执行该方程的放大版本,即我所使用的所有数字都已被同一个数字 G 进行了点乘放大。
如果您的方程式左右两边相等,您就知道我发送给您的数字签名 (s) 只能是由知道私钥 (d) 的人创建的。这便证明了我确实知道公钥 (dG) 所对应的私钥 (d)。
任何不知道公钥 (dG) 对应私钥 (d) 的人,都无法计算出能使您的方程成立的数字签名 (s)。
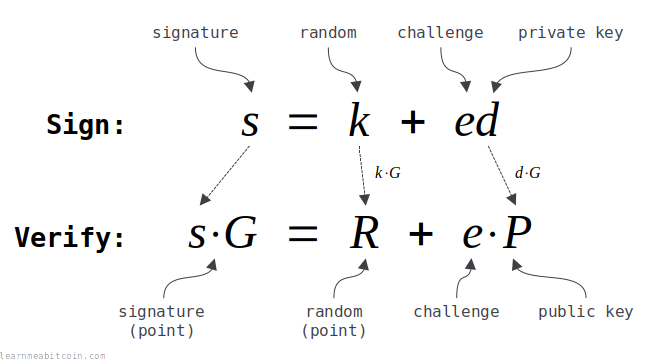
所以,这些方程是 Schnorr 签名方案的核心:
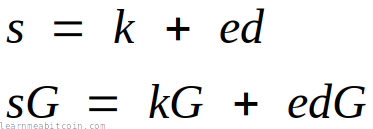
这与上面示意图中的方程完全相同,只是重新进行了排列。
5. 简单示例
到目前为止,这一切都只是使用字母表示的方程式,所以让我们使用一些实际数字来证明这些方程确实有效。
该示例仅使用了小数字和简单的乘法。
当然,这些数字太小了,系统根本无法保证安全,且普通的乘法也并非明智的选择,因为您只需使用除法即可轻松求出原始私钥。
然而在密码学中,我们使用的是庞大的数字以及一种特殊的“乘法”运算,该运算实际上并不存在反向的“除法”运算(我保证马上会讲到它)。
但至少您能看出这些方程式确实有效。
6. 非交互式 (Non-interactive)
当前设计的缺点在于它是交互式的。
换句话说,您必须在收到我发送的公有 nonce (kG) 之后,再将挑战数 (e) 发送给我,否则我将能伪造签名。
如果此方案是非交互式的,即我可以直接在我的端生成签名 (s),而我们无需在事先进行 kG 和 e 的数据往返交互,那就会方便得多。
那么如果我可以在我自己这边直接创建挑战数 (e) 呢?
为此,我需要能以某种方式承诺使用我的私有 nonce (k),同时能够在我的端产生一个不可预测的挑战数 (e),并且此后无法更改我的私有 nonce (k)。
解决方案是使用哈希函数,通过对公有 nonce (kG) 进行哈希运算来创建挑战 (e)。
哈希函数是完美的,因为它会为输入其中的任何数据生成一个不可预测的随机结果。此外,通过哈希公有 nonce (kG),意味着我已承诺了使用私有 nonce (k),因为一旦更改了 nonce,就会改变随后计算出的挑战 (e)。
因此,现在我们无需在事前进行交互式的 kG 和 e 数据传输,我可以直接计算出数字签名 (s),并将其与公有 nonce (kG) 一并发送给您。
随后,您可以使用该公有 nonce (kG) 算得与我在我这一端生成的完全相同的挑战 (e),并使用此挑战采用相同的方程来验证数字签名 (s):
结果,使用哈希函数来创建挑战 (e),使我们成功将数字签名系统从交互式升级为了非交互式系统。这是我们系统的一大便利升级。
现在每次我想创建数字签名时,我可以直接将签名与公有 nonce (kG) 一起发送给您,而不需要您先向我发送挑战 (e)。
因此,由于引入了哈希函数来创建挑战 (e),签署和验证的方程组现在看起来如下所示:
这种非交互式创建挑战的技术在学术上被称为 Fiat-Shamir 变换 (Fiat-Shamir transformation)。
7. 消息签署 (Message signing)
在此之前,我一直是在用数字签名 (s) 来证明我是某个公钥 (dG) 的所有者。
这非常酷,但如果我们能签署消息,便会更加实用,这样如果我向您发送一个签名 (s) 和一条消息 (m),您可以验证我是否说过或者同意了该消息。
这就像在现实生活中签署文件一样。您的签名本身足够独特,可以证明是您签署的,但我们通常会将签名写在像合同这样的文本上,以证明我们同意了其内容。消息 (m) 在此就充当我们想要附上签名 (s) 的“合同”。
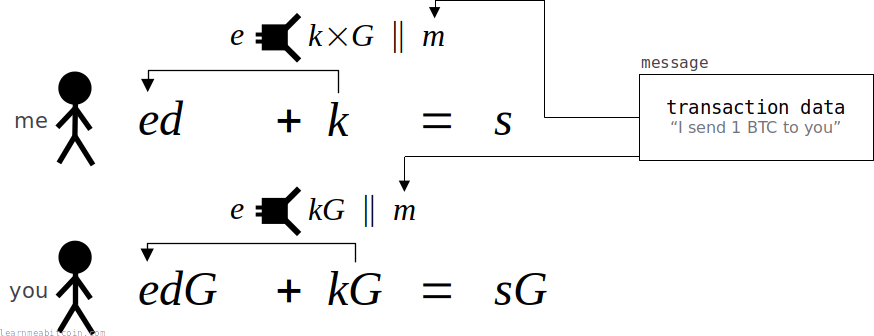
例如在比特币中,此消息通常就是交易数据。通过对交易数据进行签名,我们既可以证明自己是比特币所锁定的对应公钥的所有者(以便能解锁它们),同时又同意了我们要将这笔比特币发送到哪里。此后,任何人都不能修改交易数据(例如试图将比特币发往其他地方),否则会导致签名失效。
总之,为了能够签署消息,我只需以某种方式将消息 (m) 包含在我的签名 (s) 运算中。这是通过在创建挑战 (e) 时,将消息 (m) 也包含在哈希输入中来实现的。
通过将消息 (m) 包含在哈希输入中,我已经将此消息锁定到了我最终生成的签名 (s) 中。如果有人尝试篡改消息以假装我同意了不同的内容,该签名将无法通过针对新消息的验证。
总之,现在我们已将消息作为我们签名的一部分,签署和验证的方程看起来如下所示:
这些是非交互式 Schnorr 签名方案的基础方程组。 每当您查阅关于“Schnorr 签名”的任何数学解释时,您都会看到(以这种形式或其变体形式呈现的)这些方程式。
8. 椭圆曲线
最后,我们来到了特殊的“点乘”部分。
在此之前,我们在方程中一直使用简单的乘法。但这在现实世界中行不通,因为乘法可以通过除法轻易被逆转。
我们需要的是一种特殊的“乘法”,它具有与普通乘法相同的性质(这样我们的方程式依然成立),但不存在逆向的“除法”运算。
这正是椭圆曲线派上用场的地方。
在椭圆曲线的点上确实存在一种点乘运算:您可以取曲线上的一点(例如 G),将其乘以一个标量(例如 d),这将在同一条曲线上产生一个完全不同的新点(例如 dG)。但有趣的是,如果您把这个新点 (dG) 提供给他人,却没有任何数学运算能让他们通过除以 G 逆向推导出 d 是什么。
这对于我们的系统而言是完美的,也是为什么 Schnorr 签名的数学运算必须在椭圆曲线上进行的原因。
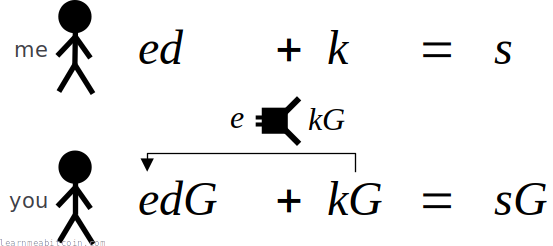
此外,您同样可以对椭圆曲线上的两个点进行相加运算,这很重要,因为我们在验证过程中也需要将两个点相加 (kG + edG)。
因此,方程以与此前相同的方式工作,但相乘和相加运算现在转为使用椭圆曲线上的点运算来进行,而不是使用我们在此之前一直在用的简单算术乘法和加法。
为了说明我们现在在方程中使用的与之前略微不同的乘法运算,我将使用点“⋅”操作符来表示椭圆曲线乘法:

- 小写字母(例如
k,d,e,s)表示一个标量 (scalar)(一个数字)。 - 大写字母(例如
G)表示曲线上的一个点 (point)。
如果您将一个点乘以一个标量,您将得到一个新的点。
还有其他不需要除法即可进行乘法运算的替代方案,但椭圆曲线因其安全性和速度而在密码学中最为流行。
9. 总结
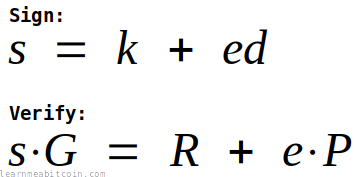
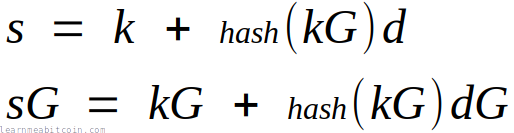
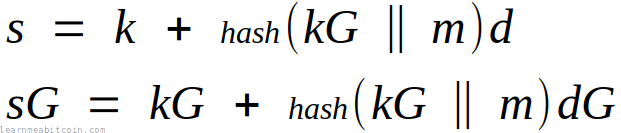
最终的 Schnorr 签署和验证方程如下所示:
我们也可以对其进行简化:
- 挑战
hash(kg || m)被简称为e。 - 公有 Nonce 点 (
kG) 被简称为R。 - 公钥点 (
dG) 被简称为P。
因此,如果我们代入这些术语,我们的方程将变为:
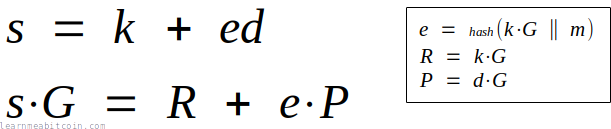
这便是我们在本页最上方所示的签署和验证公式的由来。
最后,我们可以对验证方程进行移项重新整理以得到:

而这正是比特币中用于 Schnorr 签名验证的方程式。
历史
为什么比特币从一开始就没有使用 Schnorr 签名?
在比特币最初开发时,Schnorr 签名方案还在专利保护期内。
中本聪使用 OpenSSL 库来为比特币提供密码学支持,而当时该库中并不支持 Schnorr 签名,因此他们使用了 ECDSA。所以即使 Schnorr 签名比 ECDSA 更简单也更有用,但在创建比特币时,它们并不是一个可行的选择。
以下是简要的历史发展线:
- 1989 年 — Claus Schnorr 在论文《高效识别与智能卡签名》(Efficient identification and signatures for smart cards) 中发表了 Schnorr 签名的数学原理。
- 1990 年 — Claus Schnorr 申请了 Schnorr 签名方案的专利。
- 1991 年 — Schnorr 签名方案的专利获得批准。
- 1992 年 — Scott Vanstone 博士提出将 ECDSA 作为创建数字签名的替代方案。
- 1998 年 — ECDSA 被接受为 ISO 标准。
- 1999 年 — ECDSA 被接受为 ANSI 标准。
- 2000 年 — ECDSA 被接受为 IEEE 和 NIST 标准。
- 2007 年 — 中本聪开始开发比特币,并使用 ECDSA 作为签名机制。
- 2009 年 — 比特币的第一个版本发布。
- 2010 年 — Schnorr 签名方案专利到期。
- 2015 年 — 将 Schnorr 签名引入比特币的研究工作开始。
- 2021 年 — Schnorr 签名作为 Taproot 升级的一部分被引入比特币。
总结
在比特币中创建和验证数字签名方面,Schnorr 签名是相比 ECDSA 的一大升级。
我们当初没有使用 Schnorr 签名的唯一原因是因为其专利在 2010 年前一直有效,所以 ECDSA 是当时次优的选择(它同样胜任工作,只是不够优雅)。但既然专利已经失效,我们便可以自由使用 Schnorr 签名并利用它们所带来的所有优势。
用更笃定的语气说:
真正的问题应该是,为什么人们还在使用 ECDSA?它是对 Schnorr 的低劣改造,应该早日成为历史的过去。
CurveEnthusiast, crypto.stackexchange.com
换句话说,Schnorr 签名才是数字签名本来应有的样子。
比特币中的 Schnorr 签名实现看起来比 ECDSA 更加复杂,但实际并没有看起来那么难。它底层的数学原理更加简单;只不过其上融入了某些比特币特定的设计实现。因此不要被那些复杂的图表吓跑。如果您一步一步来,实现它并不难。
此外,如果您对数字签名工作原理的数学原理感兴趣,那么先去尝试理解基础 Schnorr 签名方案然后再去研究 ECDSA 也是更为合理的路线。
您不需要知道 Schnorr 签名的工作原理也能将其添加到您的代码中,但了解它的来龙去脉是件很酷的事情。
资源
- BIP 340: Schnorr Signatures for secp256k1
- Cryptoshorts e02: Schnorr signature - 一个简单明了的视频,解释了 Schnorr 签名工作原理的基础知识。
- How to Design Schnorr Signatures - Adam Gibson 对 Schnorr 签名设计极其出色的讲解。
- Taproot, and Schnorr, and SIGHASH_NOINPUT, oh my! - Pieter Wuille 对 Schnorr 签名与 Taproot 优势的总结。
- Introduction to Schnorr Signatures with Elichai Turkel - 关于 Schnorr 签名及其在比特币中应用的学术演讲。